Sockets & Connections
Earlier, we learned about Node Properties and how they are the internal settings and parameters for a node. Every property in Fuser has an associated Socket.
Sockets are the colored circles on the sides of nodes that allow data from one property to flow to another node's property. You can think of them as "ports", passing and receiving data. Understanding how they work is the key to building powerful and effective workflows in Fuser.
What Are Sockets?
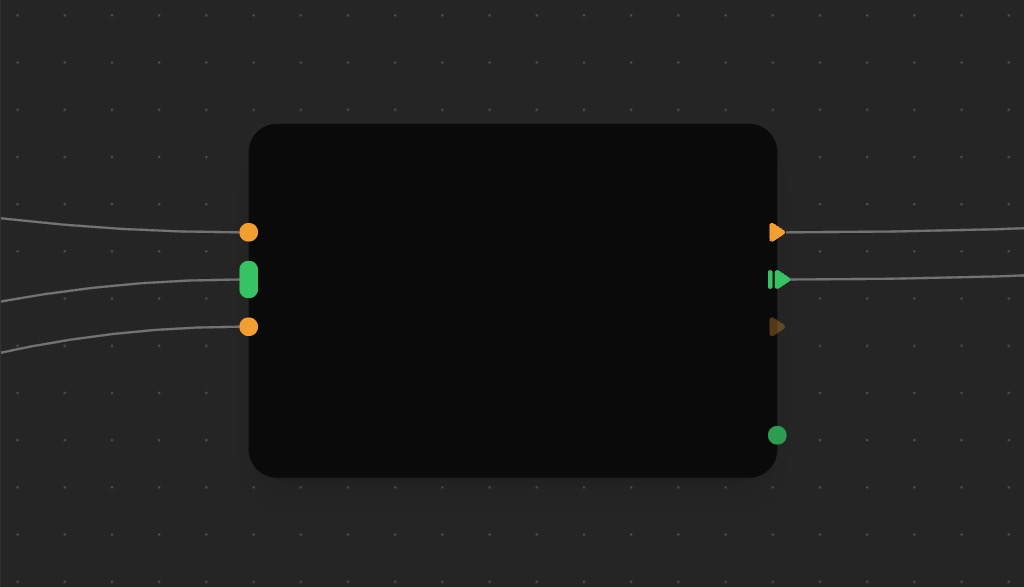
Sockets are the small colored circles on the sides of nodes. They serve as a way to connect input and output properties between nodes.
- Input Sockets are on the left side of a node and receive property data from other nodes.
- Output Sockets are on the right side of a node and send data to properties of other nodes.
This design ensures that data always flows from left to right, making your workflows easy to read and understand.
Hover over a socket to see a detailed description of the property it is connected to, including the type of data it handles, and the default value.
Socket Types by Color
The color of a socket tells you what type of data it handles. This visual system helps you quickly identify compatible connections.
- Text: For prompts, captions, and any kind of text.
-
Image: For images in
PNG,JPG,WebP, orGIFformat. -
Video: For
MP4orWebMvideo files. -
Audio: For
MP3orWAVaudio files. -
3D: For
GLBorGLTF3D models. - Style: For custom AI training styles (LoRAs).
- Number: For numeric values.
- Generic: Can handle various or unknown data types.
You can only connect sockets of compatible types. The colors make it easy to see what connects to what!
Socket Shapes

The shape of a socket tells you how many connections it can handle. This visual system helps you quickly identify compatible connections.
- Circle (Single): Can handle only one connection at a time.
- Oval (Multiple): Can handle multiple connections at once.
Input Passthrough
Sometimes you want to use the same value for multiple properties, across different nodes. For example, you might want to use the same prompt for multiple nodes. In this case, you can use a Passthrough socket.
Passthrough sockets allow you to pipe Inputs to other nodes. They are indicated by a triangle shape, and are a powerful way to create chains of nodes that share the same properties.
This allows you to update a property in one node, and have it automatically update in all connected nodes.
- Triangle: Indicates the property that is passed through supports single connections.
- Line + Triangle: Indicates the property that is passed through supports multiple connections.
In the example above, the right-most Flux Dev image generator node is connected to the one on its left via three passthrough sockets: Prompt, Style, and Seed. This means that right-most node will use the same prompt, style, and seed as the one on its left. Using passthroughs, we can quickly change the Style and have the changes propagate to all connected nodes.
To ensure clarity and reduce visual clutter, Passthrough sockets that are not connected are slightly transparent by default. Hover over the socket to change them from to for full visibility.
Creating Connections
There are two primary ways to connect nodes.
1. Quick Connect (Drag to Empty Space)
- Click and drag from a socket on the side of a node.
- Release the mouse button over an empty part of the canvas.
- The Quick Connect menu will appear, showing you a list of all the compatible nodes you can connect to.
This is the best way to discover new nodes and build workflows quickly.
The Quick Connect menu shows you all the compatible properties of the nodes that you can connect to. It supports all property types, including Inputs, Outputs, and Passthrough properties, as well as single and multiple connections.
It also shows you the name of the node, property, and the type of property you are connecting to.
2. Drag from Socket to Socket
- Click and drag from the socket.
- Drag directly to a compatible socket on another node.
- Release to create the connection.
This method is faster when you already know exactly which nodes you want to connect.
Advanced Connection Patterns
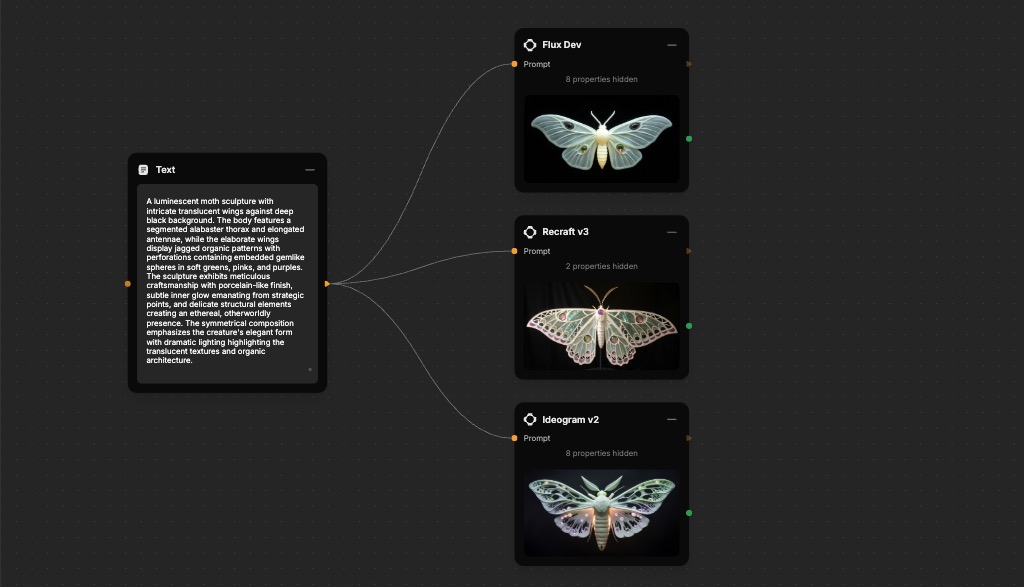
One-to-Many
Connect a single output socket to multiple input sockets. This is perfect for A/B testing different models or prompts with the same source data.
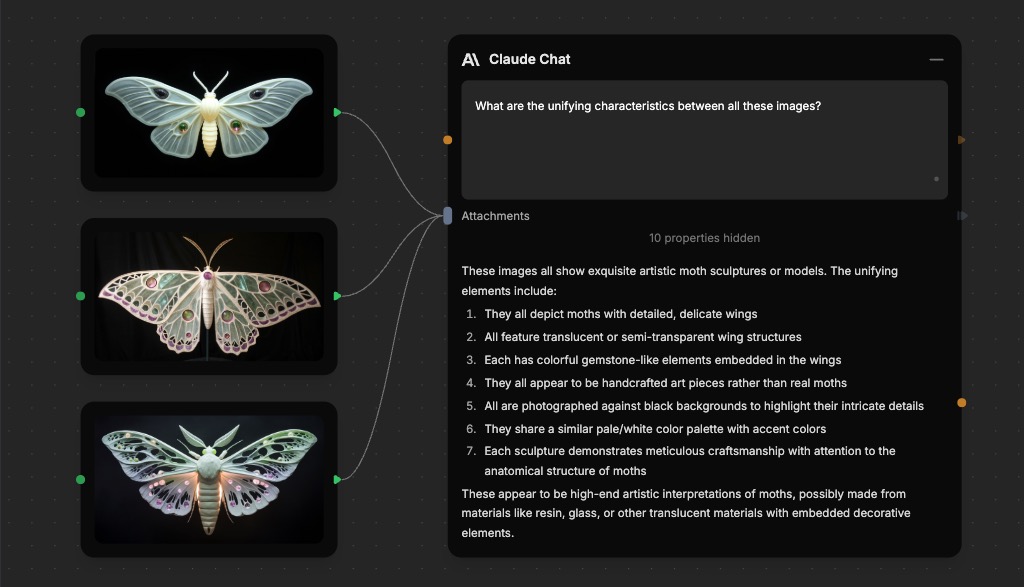
Many-to-One
Some properties indicated by can accept multiple inputs at the same time. This is useful for processing many items at the same time, for example, to analyze multiple images at once using an LLM to derive the unique characteristics of each image.
Deleting Connections
To delete a connection, simply click on the edge to select it, then press the Delete or Backspace key on your keyboard. You can also double-click on the connection to delete it.
Connection States
Connections have different visuals indicators, depending on the state they are currently in.
- Default: The connection is active and ready to be used, indicated by a gray line.
- Selected: The connection is selected, ready to be deleted, indicated by a white line.
- Processing: The connection is currently processing data from the source node to the destination node, indicated by an animated glow.
Automatic Updates
When the data in a node changes, the new data automatically flows to all connected downstream nodes, which causes properties to update. This is a powerful way to create dynamic workflows.
What's Next?
Now that you understand how to connect nodes, you can start building more complex systems.
- Building Flows - Combine nodes and connections into complete workflows.
- Nodes Reference - Explore all the available nodes and their sockets.
- Troubleshooting - Learn how to fix common connection issues.
- Interface Guide - Master the Fuser workspace.